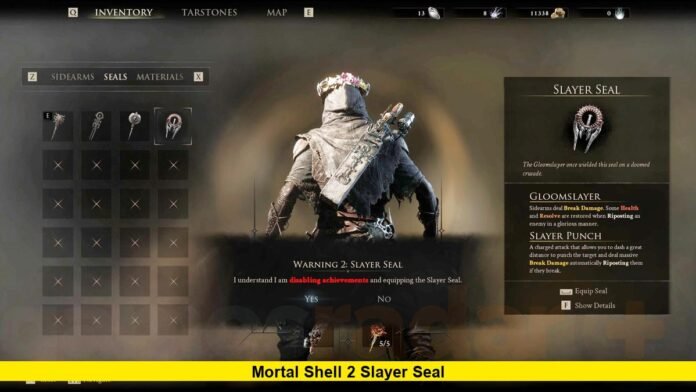

The Mortal Shell 2 Slayer Seal has become one of the most talked-about items since Cold Symmetry’s soulslike sequel launched worldwide on August 20, 2026. Players are flocking to guides and forums to understand exactly what this seal does, where to find it, and why picking it up requires a permanent decision.
Mortal Shell II is the standalone follow-up to the 2020 original, built by developer Cold Symmetry and published by Playstack. The full game arrived on PlayStation 5, Xbox Series X|S, and PC via Steam at 1:00 p.m. UTC on August 20, following a wildly popular Open Beta that Cold Symmetry confirmed had crossed one million downloads across all three platforms.
What Is the Slayer Seal?
Seals in Mortal Shell 2 are wearable equipment pieces that grant passive effects or reshape how combat works for the Harbinger and the eight playable Shells. The Slayer Seal stands apart from the rest because it fundamentally changes the pace of a fight rather than offering a minor buff.
Equipping it grants the Gloomslayer ability. This lets every Sidearm deal Break Damage, filling an enemy’s stagger meter far faster than usual. Once that meter fills, a red glowing orb appears over the enemy, signaling that a Riposte is available.
The seal also unlocks Slayer Punch, a charged melee attack that deals heavy Break Damage on its own. Landing it against a staggered enemy automatically triggers a Riposte. On top of that, successful Ripostes and executions restore both Health and Resolve while the seal stays equipped, giving players a genuine sustain loop in combat.
Where to Find the Slayer Seal
The item sits inside Marrow Keep, the game’s central hub. Players reach Marrow Keep after finishing the opening tutorial section, and most reach the seal within one to two hours of starting a new save.
Here is the general route players are using:
- Enter Marrow Keep and head toward Merrick the Merchant’s cave area.
- Exit through the opening on the far side of the cave, into a corrupted clifftop overlook.
- Follow the path right, past the outdoor ledge facing the ocean.
- Interact with the stone throne, sometimes called the Magnificent Seat, sitting on the cliffside.
The Slayer Seal never despawns or moves, so it remains available for pickup at any point during a playthrough, even much later in the story.
The Trade-Off: Achievements and Trophies
The Slayer Seal’s biggest catch is straightforward. Equipping it permanently disables most achievements and trophies for that save file. The penalty triggers the moment the seal goes into an active gear slot, not simply by carrying it in inventory, and it applies for the rest of that save.
Because of this, several guide writers recommend picking the seal up on a first playthrough without equipping it, then saving actual use of the buff for a second run once trophies and achievements are already secured.
Unequipping the seal later does not restore lost progress toward the disabled trophies on that same save, so the decision carries real weight for completionists.
A Hidden Use Beyond Combat
Interestingly, simply owning the Slayer Seal unlocks content beyond its combat buffs. Marrow Keep hides a secret room containing a chained chalice. Interacting with it triggers a prompt called Commune with Chaos, but the chalice initially just pushes the player back and deals damage.
Picking up the Slayer Seal, even without equipping it, satisfies the hidden requirement. Returning to the chalice afterward lets players actually Commune with Chaos, teleporting them into the Desolate Keep, a tougher mid-to-late-game dungeon. Clearing it rewards a Blackmarrow Key, which unlocks a Shade cosmetic for one of the eight playable Shells back at Marrow Keep.
This means even players who never intend to equip the Slayer Seal still have a reason to track it down early.
Community Reaction Since Launch
Reaction on Steam’s community boards and social platforms has been largely positive. Players testing the seal against tougher bosses, including the early-game boss Magdalena, describe enemies and mobs getting overwhelmed quickly once Break Damage builds up through Sidearm use.
Several players have compared the mechanic to the Glory Kill system from modern Doom titles, noting that the health-and-Resolve sustain loop changes the entire rhythm of encounters. Others in the community have pointed out that pairing the Slayer Seal with the Guard Seal, swapping between the two, currently produces faster Break buildup than using the Slayer Seal alone.
Slayer Seal at a Glance
| Feature | Detail |
|---|---|
| Ability granted | Gloomslayer |
| Sidearm effect | Deals Break Damage |
| Riposte bonus | Restores Health and Resolve |
| Special attack | Slayer Punch (charged Break Damage) |
| Location | Stone throne, corrupted clifftop, Marrow Keep |
| Major drawback | Disables most achievements/trophies once equipped |
| Hidden bonus | Required to Commune with Chaos and reach Desolate Keep |
Why This Matters for New Players
Mortal Shell 2 launched without a traditional difficulty menu, leaning instead on systems like the Slayer Seal and the separate Gloombound Flame, which triggers a harder Night Mode, to let players adjust their own experience. For newcomers overwhelmed by the game’s aggressive enemies, the Slayer Seal effectively functions as an opt-in easy mode without altering enemy placement or level design.
With the game now fully live and its player base still climbing past the beta’s six million-plus combined views on YouTube, Twitch, and short-form video, the Slayer Seal has quickly turned into one of the most searched-for topics among new Harbingers finding their footing in Cold Symmetry’s expanded, open-world take on the Mortal Shell formula.
Got thoughts on the Slayer Seal trade-off? Drop your take in the comments below and let us know how you’re building your Harbinger.